


How to create a table of contents in Microsoft Word
How to create a Table of Contents
- Apply the built-in Heading styles to the headings in your text.
- In Word 2003 and before: Insert > Reference > Tables and Indexes. Click on the Table of Contents Tab. Click OK.
- In Word 2007 and Word 2010: References > Table of Contents > choose an option from the menu.
Creating a table of contents in a Microsoft Word document is a two-step process. First, identify the text that you want to appear in the Table of Contents. Second, tell Word to insert the Table of Contents. Having created your Table of Contents, you can then customize it in several ways, to suit your needs.
On this page
- Identify the text that you want to appear in the TOC
- Create the TOC
- Customize the TOC if you need to
- Other tips
Identify the text that you want to appear in the Table of Contents
In your document, click within the first major heading that you want to appear in the Table of Contents. Apply the Heading 1 style to that paragraph. The easiest way to apply the Heading 1 style is:
- in Word 2003 and earlier: click the Style box on the Formatting toolbar and choose Heading 1
- in Word 2007 and Word 2010: on the Home tab, in the Styles group, click the Heading 1 thumbnail.
If these don't appeal to you, there are several other ways to apply a style.
In the same way, apply the Heading 1 style to other major headings in your document. Apply the Heading 2 style to sub-headings, Heading 3 style to sub-sub-headings etc.
If you don't like the way the heading styles look (eg, you want a different font or font size or colour), don't format the text directly. Instead, modify the heading styles.
Create the Table of Contents
Word 2003 and earlier versions
- Click where you want your Table of Contents to appear.
- Display the Table of Contents dialog. To do that:
- In Word 2000, choose Insert > Index and Tables.
- In Microsoft Word 2002 and 2003, choose Insert > Reference > Index and Tables.
- Click on the Table of Contents tab. Click OK.
Word 2007 and Word 2010
- Choose References > Table of Contents.
- Choose one of the following items on the menu.
- There may be custom tables of contents on your menu. If you click the thumbnail for a custom table of contents, your table of contents will be inserted into a content control. (There is further information about content controls below.)
- There are two built-in 'automatic' tables of contents: Automatic Table 1 and Automatic Table 2. If you click the thumbnail for either of these, your table of contents will be inserted into a content control, and Word will add a heading. (There is further information about content controls below.) The only difference between the two is the text of the heading ("Contents" and "Table of contents").
- There is a built-in "Manual Table". This takes you back to the era of the electric typewriter. If you like typing things out for no good reason and your life expectancy is a lot longer than mine, this is for you.
- At the bottom of the menu, you can choose Insert table of contents. This displays the Table of Contents dialog that was also in earlier versions of Word. If you want two or more tables of contents in one document, you must choose this option for at least the second and subsequent tables of contents.
Using a table of contents content control in Word 2007 or Word 2010
You can use the content control to manage your table of contents (Figure 1).
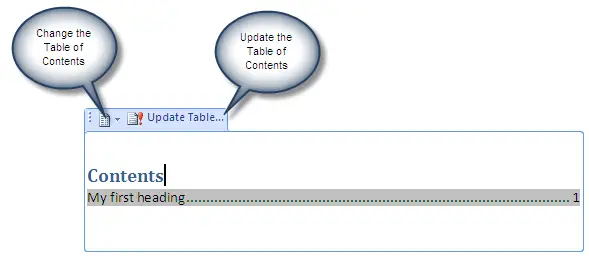
Figure 1: A table of contents in a content control
If you attempt to insert another custom or built-in table of contents that will be placed in a content control, then the new one will over-ride the existing one. If you want more than one table of contents in a document, use the "Insert table of contents" menu option for all, or at least the second and subsequent, tables of contents.
How to create a custom table of contents and have it appear on the Table of Contents menu in Word 2007 or Word 2010
You can save a custom table of contents and have it appear on the References > Table of Contents menu.
- Insert your table of contents into any document, and adjust it to suit your needs.
- Add text above and/or below the table of contents as required (for example, add a heading "Table of Contents", preferably formatted with the built-in TOC Heading style).
- Select the text above, the table of contents, and the text below.
- Insert > Quick Parts> Save Selection to Quick Part Gallery.
- In the Create New Building Block dialog:
- give your table of contents a name
- in the Gallery list, choose Table of Contents
- in the Category list, choose 'Create new category' and name your new category
- click OK.
You can now insert your table of contents using References > Table of Contents. It will be inserted into a content control, like the built-in tables of contents.
Word displays entries in the menu in alphabetical order by category. Sadly, there are few letters in the alphabet before the "B" for "Built-In". If you want your custom tables of contents to appear before the Built-In category, but there is no name between "A" and "Built-In" that suits you, then put a space at the beginning of the category name. For example, name your category " Shauna". A space is alphabetized before a letter, so " Shauna" will be displayed before "Built-In".
Customize the Table of Contents (if you need to)
How to change the look of the headings in the document
Use the Document Map
Once you have applied your Heading styles, choose View > Document Map or, in Word 2010, View > Navigation Pane and select the Document Map. You can now see roughly what will be included in your Table of Contents.
Right-click in the Document Map to choose which levels of heading to view.
If you don't like the way your headings look (eg you want a different font, font size, colour, more or less spacing before or after the heading), don't choose Format > Paragraph or Format > Font (in older versions of Word) or use the tools on the Home tab (in newer versions of Word). And don't use the font size or bold buttons on the toolbar or ribbon. Instead, modify the Heading style.
How to change the look of the Table of Contents itself
To modify the Table of Contents itself, you need to display the Table of Contents dialog. To display the dialog for an existing table of contents:
- in Word 2000: click within the table of contents and choose Insert > Table of Contents
- in Word 2002 and Word 2003: click within the ToC and choose Insert > References > Table of Contents
- in Word 2007 and Word 2010: click within the ToC and then click References > Table of Contents > Insert Table of Contents (if the ToC is in a content control, be sure you've clicked the ToC itself, and not any "Contents" heading above the ToC)
From the Table of Contents dialog you can modify the Table of Contents in several ways.
- By default, Word shows three levels in your Table of Contents. That is, it puts the text from Heading 1, Heading 2 and Heading 3 in the Table of Contents. If you want to show more or fewer levels, in the Table of Contents dialog, change the number in the Show levels box.
- There are very good reasons for using the built-in Heading styles. But if you really need to use other styles (other built-in styles, or custom styles), you can put them in your Table of Contents. In the Table of Contents dialog, click Options, and allocate your style(s) to the appropriate level(s).
- To change the font, font size, colour etc used to create the Table of Contents itself, you need to do two things in the Table of Contents dialog. First, make sure that, in the Formats box, you have chosen "From Template". Second, click Modify and modify the relevant TOC style. Word uses style TOC 1 for the top level of contents, TOC 2 for the next level etc
For sophisticated customization, you can edit the switches in the TOC field.
How to create a table of contents for several documents
To create one table of contents for several documents, you need to do the following.
- Create a separate document to hold the table of contents (we'll call this "the ToC document").
- For ease, put all the documents, and your ToC document, in the one folder.
- In your ToC document, use an RD (Reference Document) field for each document that you want to include in your Table of Contents.
- To insert an RD field, do ctrl-F9 and, within the brackets that Word gives you, type RD "filename". For example { RD "Chapter 1.docx" }. You can't type the curly brackets by hand. You must do ctrl-F9.
- If you can't put all your files in one folder, you must use double backslashes and double quotes. For example, { RD "C:\\My folder\\Chapter 1.docx" }.
- In theory, you can use relative path names. But it never seems to work properly<g>.
- Add an RD field for each document that you want to reference, in order.
- Create the Table of Contents in this ToC document in the usual way.
- Remember the page number rule: "The Table of Contents will pick up whatever pagination appears in your document". It applies when using RD fields to create a ToC for many documents. You may have to set the starting page number manually in each document if you want pagination to run consecutively through your project.
Other tips about Tables of Contents
- If you have Word 2003, Microsoft has some great online training about Tables of Contents available for free. See
- A Table of Contents is a field, not ordinary text. To see fields in your document, you can tell Word to display fields with grey shading. The grey doesn't print, but it reminds you that this is a field, not ordinary text. To display fields with grey shading:
- in Word 2003 and earlier versions: Tools > Options > View; set the Field Shading box to Always.
- in Word 2007: Click the round Office (pizza) button, click Word Options, then, in the menu at left, click Advanced and in the 'Show document content' section set Field Shading to "Always".
- in Word 2010: Click File, then Options, then, in the menu at left, click Advanced and in the 'Show document content' section set Field Shading to "Always".
- Tables of Contents don't update automatically when you add a new heading to your document. This is because a ToC is a field. To update a Table of Contents, put your cursor in the Table of Contents and press F9 to update it. Or ctrl-a F9 to update all fields in the document. In Word 2007 and Word 2010, if your table of contents is in a content control, you can use the content control to update the ToC.
- When you update your Table of Contents, always choose to update the Entire Table (Figure 2).

Figure 2: Whenever you see this box, always choose the second option and update the entire table.
- To ensure that Word always updates the Table of Contents when you print your document, do Tools > Options > Print. Tick the Update Fields box.
- The Table of Contents will pick up whatever pagination appears in your document. To control page numbers, see How to control the page numbering in a Word document at the Word MVP FAQ site
- If the tabs in your Table of Contents seem to have gone crazy, see Whenever I update my Table of Contents it acquires unwanted tabs, and I have to press Ctrl+Q to get rid of them at the Word MVP FAQ site
- To make changes to your Table of Contents, click within the ToC, or use the arrow keys to get within it. Then re-do Step 2. This will edit your existing Table of Contents, rather than creating a new one.
- By default, all versions of Word make the page number in a Table of Contents a hyperlink to the heading within the document. But recent versions, by default, make each entry in the ToC a hyperlink. This can easily drive you crazy.
To solve the problem, select the whole of the Table of Contents (selecting a few paragraphs either side is OK). Do Shift-F9. You'll see the field codes exposed, and they'll look something like { TOC \o "1-3" \h \z }. Edit these codes to remove the \h. Press F9 again to re-generate the ToC and hide the field codes. (By the way, you can't type the curly brackets yourself. If won't work. If you want to type out the field codes manually, use ctrl-F9 to create the curly brackets.)
- For advanced techniques for selecting the content to appear in a table of contents, and how to format it, see TOC Tips and Tricks.
Note: It is also possible to create a Table of Contents by marking each individual paragraph that you want to appear in the ToC. Then, you tell Word to use your marked paragraphs to create the ToC. You do this using { TC } fields. It seems to me that the chance of human error in accidentally omitting to mark a heading is large. I wouldn't risk it. But if you're interested, look at Word's help under TC.
How to number headings and figures in Appendixes in Microsoft Word – includes information on creating a table of contents when you have appendixes in your document
How to use the Document Map in Microsoft Word – the Document Map roughly mirrors your table of contents